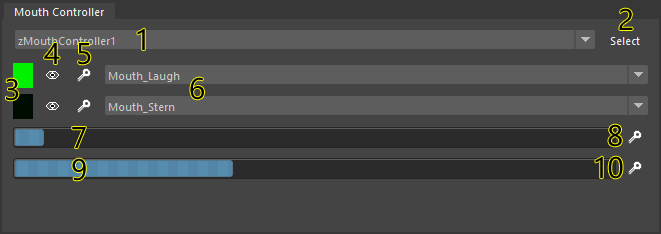
This controls a list of blend shape targets. Any number of blend shapes can be controlled, with up to two active at any given time. Regardless of how many blend shapes are available, only four attributes need to be keyframed: an attribute to select each of the two active blend shapes, one attribute to blend between those two blend shapes, and an attribute to enable the combination.
Blend shapes can be added without affecting existing scenes, and without adding any extra nodes to the scene.
Open the keying interface with Skeleton > Mouth Controller.

| 1 - Node selection | Choose the zMouthController node to edit. |
| 2 - Select node | Select the node chosen in the node dropdown. |
| 3 - Weighting display |
This gives a quick visualization of which shape is active.
Green indicates that the shape is selected, and black indicates that the shape is deselected. |
| 4 - Solo | Solo the selected shape. This allows quickly selecting a shape without modifying the weights. |
| 5 - Key shape selection | Set a keyframe for the shape selection. |
| 6 - Choose shape | Select the blend shape to use in each slot. |
| 7 - Blend between shapes |
Select which of the two shapes is active.
When this bar is on the left, the first shape is active. When it's on the right, the second shape is active. |
| 8 - Key shape blending | Set a keyframe for shape blending. |
| 9 - Mouth open/close weight |
Set how much to activiate the blended shape.
When this bar is on the left, the blend shape is disabled and the base shape is displayed. When it's on the right, the selected blend shapes are fully active. Since the base shape normally has a closed mouth, and the blend shapes open the mouth in various ways, this controls how much to open the mouth. |
| 10 - Key open/close weight | Set a keyframe for the mouth open/close weight. |